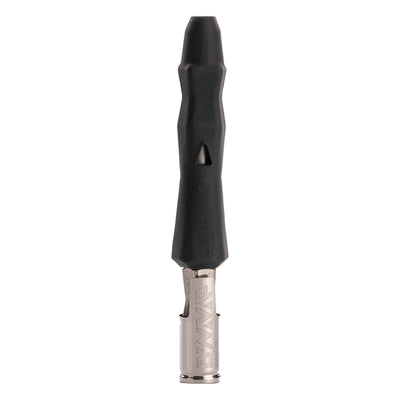
The DynaVap M Plus dry herb vaporizer is just like any other DynaVap vaporizer but still requires a bit of know-how to master. If this is your first time wielding a DynaVap, pay close attention and follow along for a strong first session.

Quick rundown
- DynaVap 101
- Choose a torch
- Grind your herbs
- Pack it
- Heat it
- Hit it
- Let it cool
- How to extract in on cycle
- Empty the chamber
DynaVap 101
Listen for the clicks
The DynaVap ‘clicks’ are the most important element for good sessions. Pay attention to them or you may burn your herbs. Each click represents two things: one click when it’s ready to vape, and one when it’s below vaping temperature. Most caps include a quick second click at both stages to make sure you don’t miss it.
The first set of clicks
The first set of clicks means it’s at vaping temperature and is ready to vape. Don’t heat much further or you’ll quickly burn your herbs. From here, the M Plus is ready for you to enjoy.
Wait for the second set to re-heat
You’ll hear a second set of clicks when it drops below vaping temperature, which could take up to a minute. Don’t apply the heat again until you’re sure you’ve heard the second click.
You’ve probably got a few more hits left in your load so before you reheat it, make sure you hear the second pair of clicks. Many times I've gone in for another heat cycle before I hear the second clicks and completely torch the load.
Use a torch lighter
Torch lighters are the primary source of heat for DynaVap vaporizers. Technically, most heat sources, like a soft flame lighter, will work but take much longer to reach temp. Torch lighters are found in single, double, triple, and even quad flame configurations. Personally, I prefer single flames for more control. More flames are better for faster heat ups, but it’s all up to personal preference.

Fill the torch
Your torch will likely arrive without any butane in it so make sure you have a tank ready to fill it up. To do this, turn the torch upside down and press your butane tank into the filling hole on the bottom for four to five seconds, until it stops filling up.
The torch will start to feel cool to the touch so hold it in your hand for about 30 seconds until the lighter is at room temperature. Then, use the flame adjuster on the bottom to bring the flame as low as it will go without flickering.
Most grinds will do
The DynaVap M Plus will handle basically any herb consistency. If it’s too fine, it may pull through the screen, and if it’s too chunky, it might need stirring, but basically any two or four piece grinder works great.
Pack it
Remove the cap from your vape and fill the chamber with ground herbs up to the top. You can either use a small scoop and pour it in or dig the tip into your bed of herbs and scoop it in that way. Give a light tamp to set it all in place and then put the cap back in place.
How to heat your DynaVap M Plus
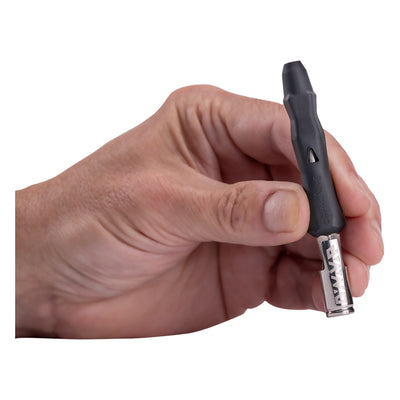
Now this is where the fun begins. Take your DynaVap M Plus in one hand and hold the torch lighter in the other. Turn on the torch and hold the cap in the light blue halo of the flame -- that’s the hottest part. Keep rotating the vape slowly between your fingers, so it evenly heats all sides, like an herb rotisserie -- don’t apply heat directly to the end of the cap, only the sides. Ideally, you’ll apply it at about a 45 degree angle facing away from you, pointing from the base up towards the far corner of the tip.

You control the temperature
You can even vary the temperature by moving the flame. If you keep the flame further out towards the tip, the vapor will stay on the cooler side. Bring the flame lower down on the cap, towards the mouthpiece, to heat it up.
Hit it!
Once it clicks, it’s ready to go. From here, put the mouthpiece to your lips and take a nice gentle pull. If you want, feather the airport with your finger to adjust how thick or smooth the hit is. Cover more of the airport for thicker clouds and a slower draw, or leave it open for a wide open draw, and adjust during your hit as you taste the vapor.
Cool down
After you’ve taken a draw, make sure to wait until the tip clicks again before you apply any more heat. It’s better to wait a little longer until your next hit than scorch everything inside. At this point, you can fire it up again, leave it be until you’re ready for another, or let it cool down a little further to unload.
M Plus and one-cycle extractions
The M Plus grants users the ability to fully extract their herbs in just one heat cycle. As I mentioned before, heating higher on the tip provides cooler hits while heating lower on the tip is much hotter. That’s the idea with this heating method.
I would consider this method a little more advanced. It takes slightly more technique to nail and can go south pretty quickly if you’re not careful.
Please note the following before attempting this heat up method.
- The upper half of the stem towards the tip WILL get hot!
- Hold the stem above the airport towards the mouthpiece at all times.
- I recommend a single flame butane torch lighter with this technique to prevent the stem from getting too hot to handle.
- When you take your hit, hit it with the airport wide open to prevent overheating your herbs
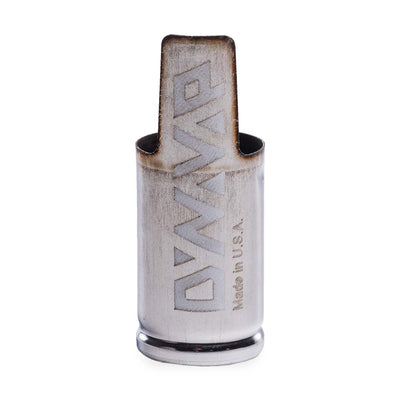
At the bottom of the tip you’ll see small dimples surrounding the base. This is your target area. When heating it up, angle the flame towards these little dimples. Spinning the M Plus isn't necessary here but I like to rock it side to side just a bit. Once it clicks it’s ready to go. Take a hit with the airport wide openl/ and enjoy! The M Plus will keep vaping before it clicks out so take as many hits as you want until it clicks again.

Empty the chamber
Once you’ve given it some time to cool down a bit, and it’s not too hot, clear the chamber out of the finished herbs. This will help keep your VapCap vaporizer cleaner in the long run, and save you some deeper cleaning sessions. You can use the tail of the cap to scrape out any bits that are stuck inside.